
ONCE UPON A SPRINGTIME, I have received an email from Graphic 45 saying they are looking for a New Design Team for 2016.

I was in my garden that time while reading the email, looking at blossoming flowers and butterflies, dreaming about fairies, when a frog appear saying "its almost Easter! You must get some Easter Bunnies!"


I was shocked! Hearing the frog talk! So look around to check the time.

"Oh! Its time for me to pick up Jared." I look back at the frog but I did not see it there anymore. So I hurriedly water my GILDED LILY so I could go pick up my Jared.


On my way to pick up Jared, I passed BY THE SEA which is right beside Jared's School.
"Oh! How I love the smell of the Sea Breeze."

I saw kids playing on the Sand and some beautiful Sea Shells. It looks so amazing! What a very nice afternoon sight...


Looking at the Sea...... I started dreaming of a Voyage Beneath the Sea (coming soon). Then suddenly,,,,,, I hear a voice saying "Mama, Lets Go!". I look down, it was Jared, smiling at me and giggling. I smiled back at him, kissed his chubby cheeks and walked hand and hand with him home.....

The End.......
Voyage Beneath the Sea coming soon.......

Graphic 45 Design Team Audition 2016
Projects using Graphic 45 Papers
Once Upon A Spring Time
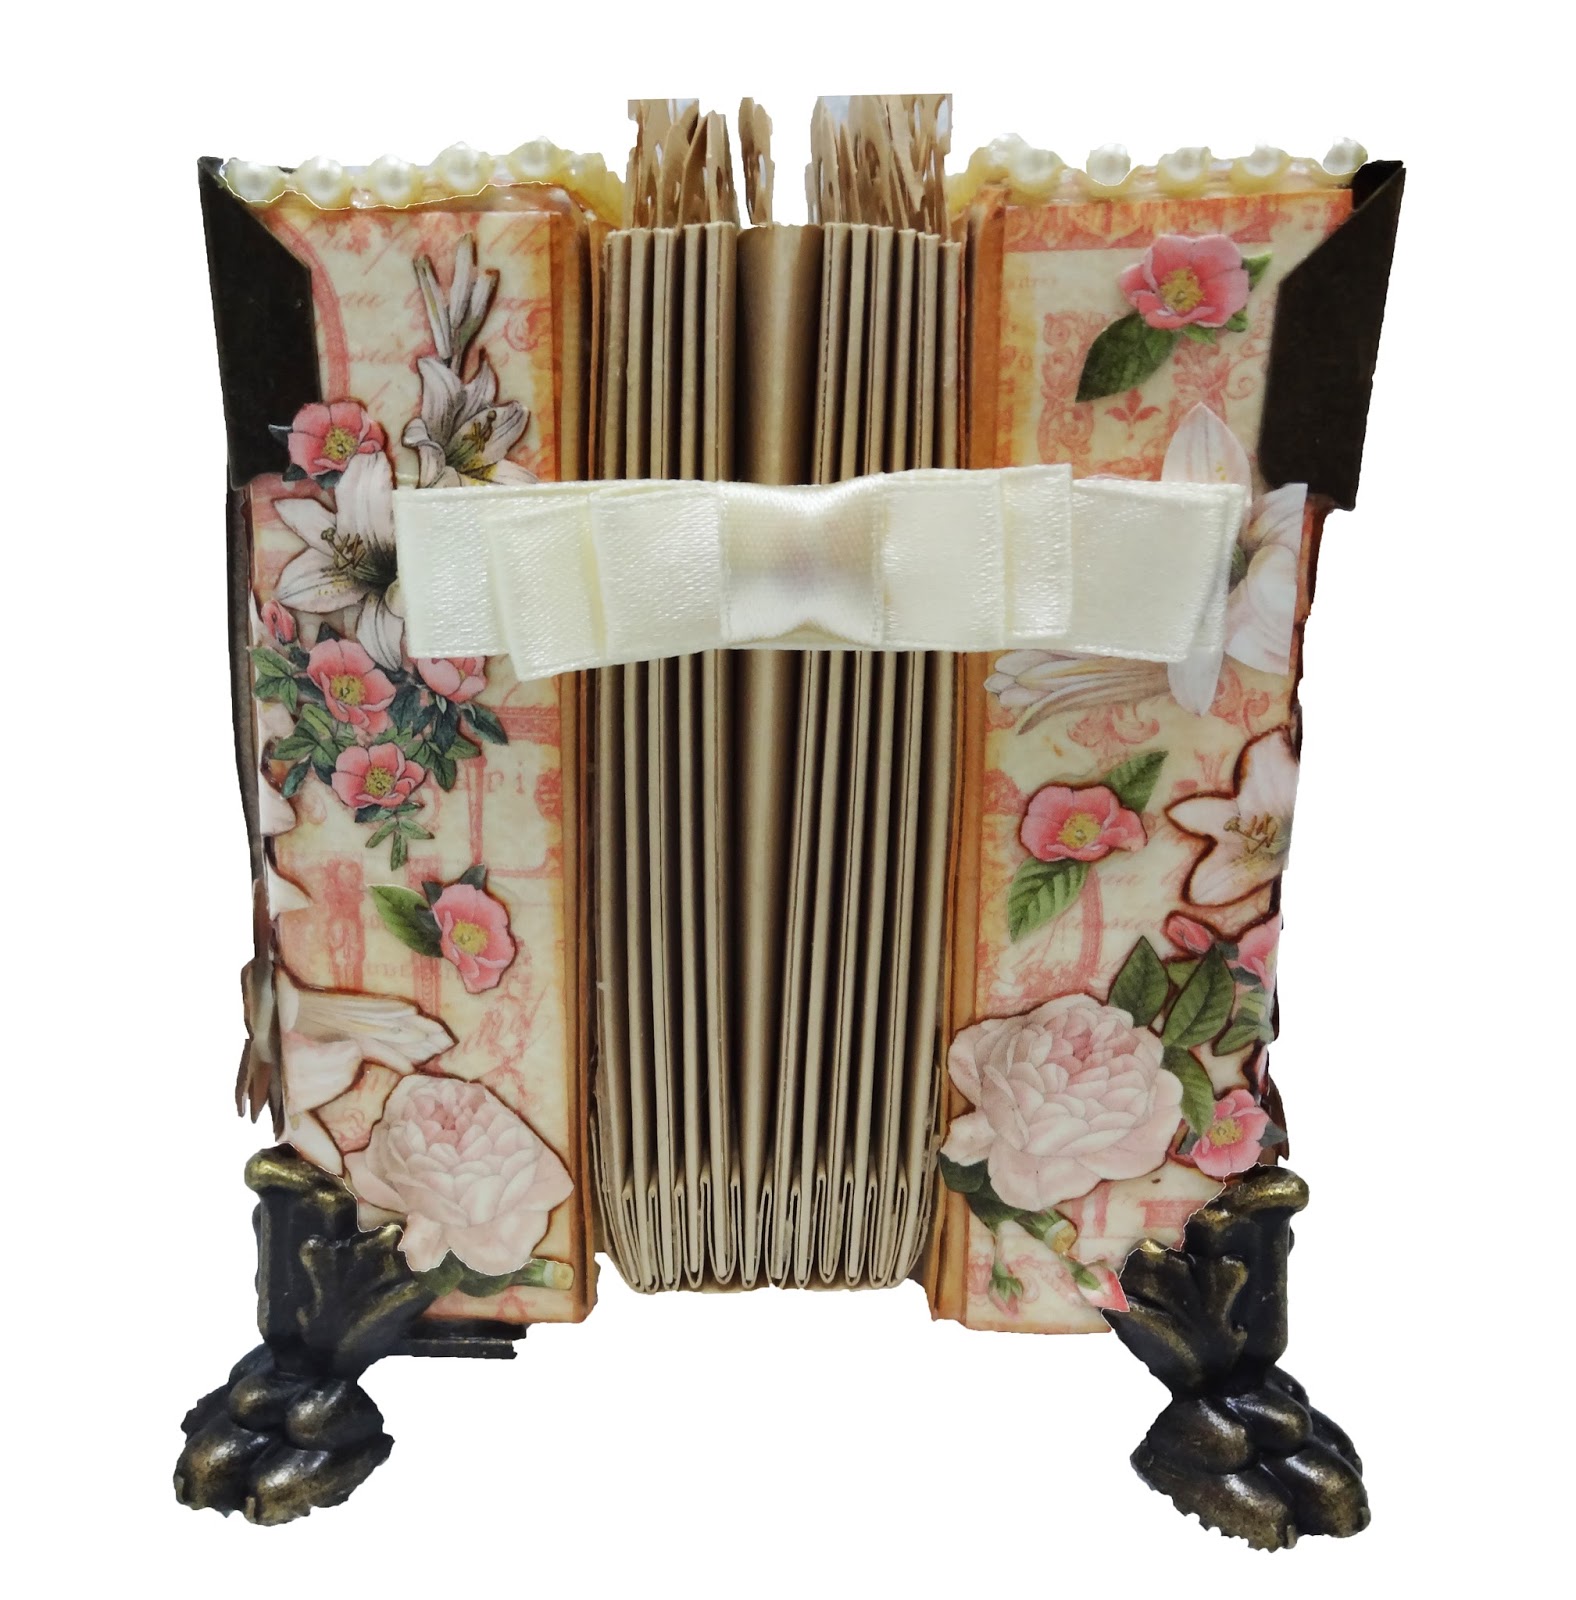
Gilded Lily
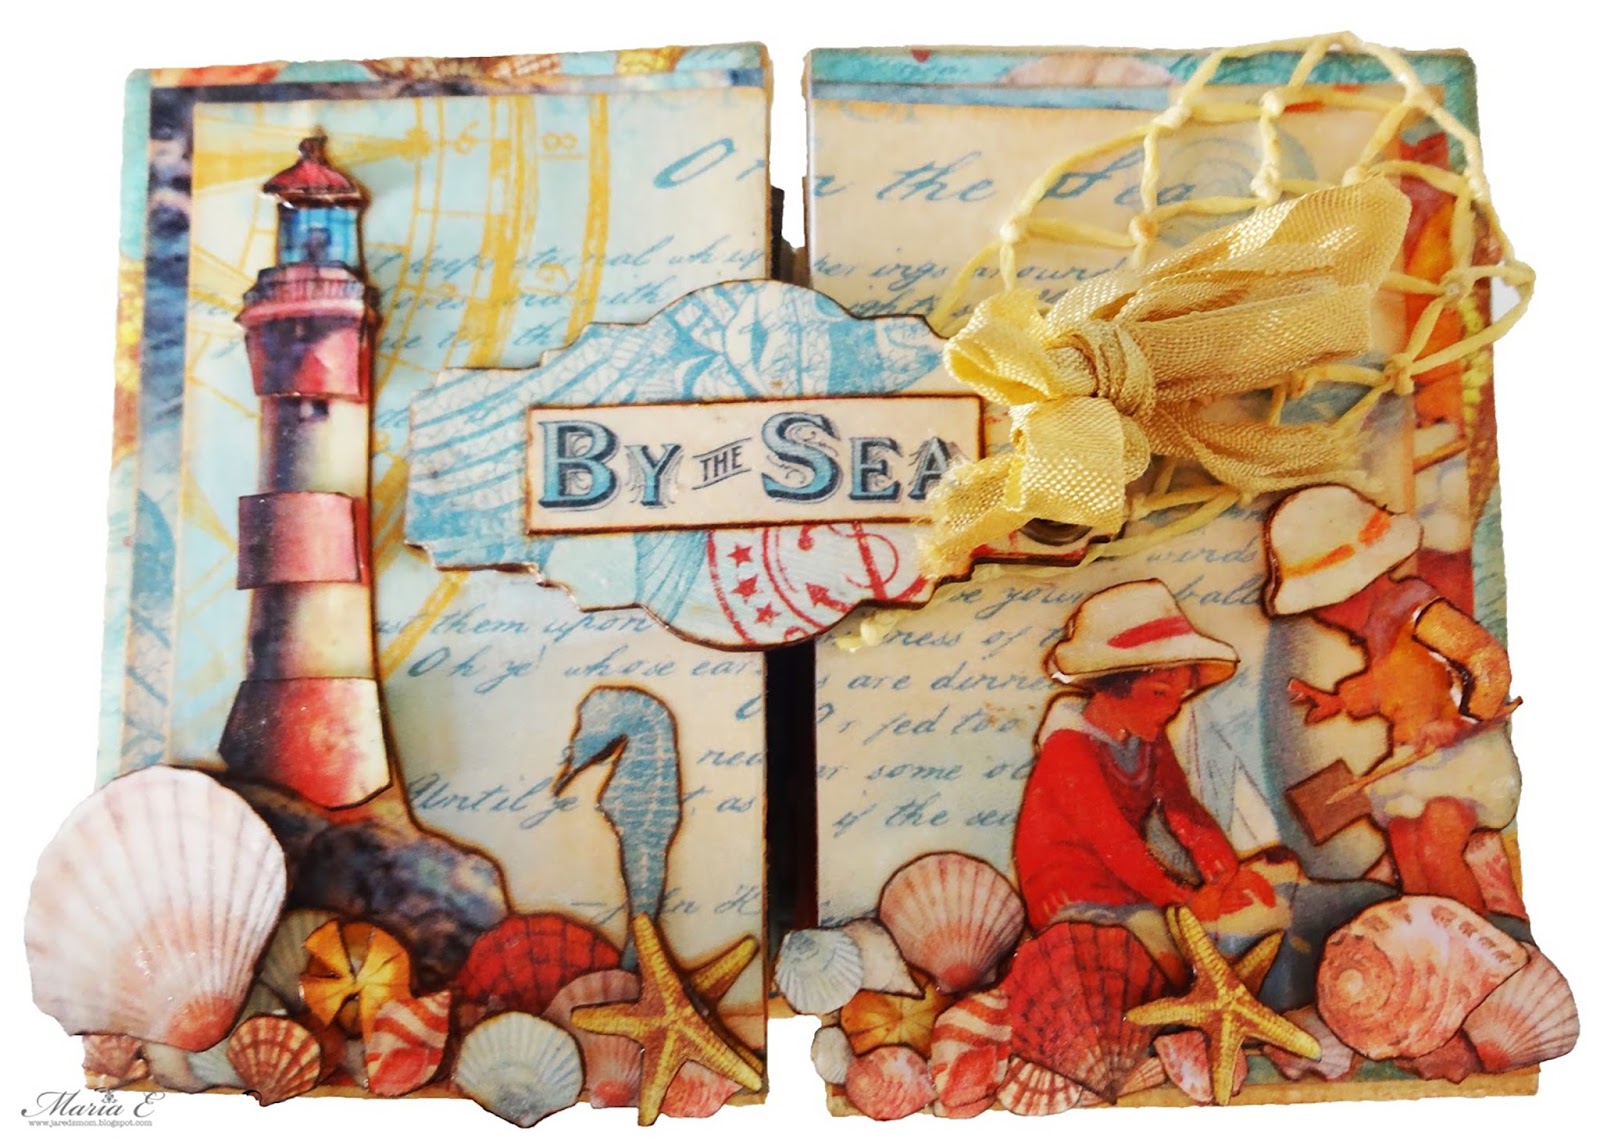
By The Sea
My Entries for the Graphic 45 Design Team Audition 2016.
 |
| Altered 11x11 inches wall Clock using Graphic 45 - Once Upon a Springtime. |
 |
| 4 x 4 inches Accordion Mini Album using Graphic 45 - Gilded Lily |
 |
| 5 x 4 inches Instax Mini Album using Graphic 45 - By The Sea |
My tutorial for today will show everyone how to make an instax mini album. I was having a problem with all my instax pictures before, as I have been taking a lot of pictures of my son using the instax camera, but I don't know where to place it. I am a very sentimental person, I love to keep almost every object that can symbolise a good memory of a happy experience, esp. pictures. So I want to keep it somewhere nicely and intact, and somewhere where i can write some special dates and memories. So here it goes.....
1. The PATTERNS.
I started by making my patterns. PATTERN A: will be the for picture (where you can place it, or rather insert it) and PATTERN B: is for the designer paper (for designing and covering the pattern for the picture).
A. Cut a Cardstock or any Thick Paper used or unused like so....
 |
| PATTERN A: This is where we are going to insert the instax pictures. |
 |
| PATTERN B: This is a Pattern for your pattern Paper |
B. Now that you have your PATTERNS ready, you have to cut the following using your PATTERNS.
PATTERN A: Cut 20 pieces of PATTERN A using a Solid Color Cardstock (as per your preference). I have used Cardstock as I will be using Graphic 45 - By the Sea Paper and the Craft Color Cardstock reminds me of the color of the beach sand, thats why I chose it. And then Score each one of them starting from 2.25in then 4.5in then the tail. The I assemble it. Please refer to the image below:
 |
| PATTERN A cut out |
 |
| Score everything like so. |
 |
| Assembled |
PATTERN B: Cut 20 pieces of PATTERN B using the Pattern Paper (your choice of design), and then ink it on the edges using Ranger Tim Holtz Distress Inkpad - Tea Dye. I have chosen GRAPHIC 45 - By the Sea 12x12, since I love to play with sea shells and this amazing paper allows me to play with shells, even without having to buy the real one. This is what I like about G45 Papers, I don't need to own a lot of embellishments, the paper speaks for itself. That is why in most of my G45 Projects I used very minimal embellishments like one ribbon or one plaque or NO EMBELLISHMENTS AT ALL, as G45 Papers allows me to do so. In short, it is already amazing even without embellishments.
2. Its time to make the Skeleton of the Album!!!!!!
A. THE ALBUM COVER: Cut a chipboard and cover it with a Cardstock. Refer to the illustration and the images below for the measurements and the actual Album Cover:

 |
| The Outcome |
B. Making the Spine and the Fold of the Album.
SPINE: Make 2 Spines one for the left and one for the right. It should be 5 pages Spine. I made my spine using Kathy Orta's Hidden Hinge Binding. I Score 12inches x 4 inches paper by 0.5inches. As per the Image below.

ALBUM FOLD: I have cut out 10 pieces of 2.25 inches width x 7 inches length Craft Cardstock and Scored it into Half 3.5inches and attached it on both my Spines. And Then I attached my PATTERN A on the back and front of the Album Fold. Refer to the images below:
 |
| Attaching one side of it from top to bottom on the Spine. The is the back view. |
 |
| Front View |
 |
| This is how it looks like once you fold the Album Fold. |
 |
| Attaching PATTERN A on the backside and frontside of the the folded Album Fold. |
 |
| While Im drying it, I use some paper clips on the sides to make sure it won't move. Because I was using Mod Podge as an Adhesive. I am fun of using Mod Podge. I do use double side tape sometimes. |
 |
| Front view. Showing the pattern paper I placed inside. |
A. The Inside.
NOTE: All my fuzzy cut images where inked on the edges using distress markers and Mod Podge - Matte on top. I have used Rangers - Tim Holtz Distress Marker - Vintage Photo to ink up the edges of my images on this project.
I started that covering my assembled and attached to the spine PATTERN A with my cut outs of PATTERN B and Decorated each one of them with fuzzy cut images from the Graphic 45 - By The Sea Collection like so....


I also cut out different Pattern Paper to cover the inside of my flaps and made a belly band on one side of it. But before I glue the pattern paper on it, I place a magnet on both sides for enclosure, then cover it up with my pattern papers.

I have made some for journaling and have placed it in the belly band.


And then I started Decorating the whole inside with some fuzzy cuts, I stick it and Mod Podge - Matte it on top.


B. The Cover
NOTE: All my fuzzy cut images where inked on the edges using distress markers and Mod Podge - Matte on top. I have used Rangers - Tim Holtz Distress Marker - Vintage Photo to ink up the edges of my images on this project.
I started covering the whole album cover with pattern papers from Graphic 45 - By The Sea Collection like so.


Then I die cut a chipboard and cover it up with pattern papers from Graphic 45 - By The Sea Collection like so. I ink up the edges of the cut outs with Rangers - Tim Holtz Distress Marker - Vintage Photo.


I started sticking my cut outs all over using a Mod Podge - Matte like so.
NOTE: All my fuzzy cut images where inked on the edges using distress markers and Mod Podge - Matte on top. I have used Rangers - Tim Holtz Distress Marker - Vintage Photo to ink up the edges of my images on this project.

Then I layered over some more cut outs that I backed with a cardstock and inked up with Rangers - Tim Holtz Distress Marker - Vintage Photo and started sticking them using a double sided foam tape like so.

I added a Fish Net (I made this fishnet using a jute string, because I don't have a fish net ready at home so I made one), some eyelet and seam binding ribbon for the enclosure.

And there I have it!!

Products / Materials Used:
- Graphic 45 - By The Sea 12x12 Paper Collection
- Craft Cardstock
- Mod Podge - Matte
- Ranger Tim Holtz Distress Marker - Vintage Photo
- Ranger Tim Holtz Distress Inkpad - Tea Dye
- Sizzix Tim Holtz Mover & Shapers -
- We R Memory Keepers - Eyelets (bronze)
- Fishnet (Made By Me)
- Wild Orchid - Seam Binding Ribbon - Camel
I hope you all like my story and my tutorial! Until next time!!!!!!! Happy Crafting!!!!! =)
You created such wonderful projects and we love that tutorial! Each project is absolutely great. We are so honored your submitted for our Design Team. Thank you so much! Happy Papercrafting, Charee and Joanna from Graphic 45
ReplyDeleteThank you so much!=)
Delete