Welcome to my Crafting World!

Hi! My name is Maria, I am 34 years old and I'm a certified Craft-a-holic! LOL. I make different kinds of projects from Cards (which is my favourite), Art Tags, Mini Albums, Jewelries, Candles, Party Favours etc...

I've created this blog to share my projects and ideas to everyone who loves to craft.

Being a Certified Craft-A-Holic, you would expect to see me creating 3-4 projects simultaneously in one night. But of course, I don't finish them all in one night, esp. when I am doing a project that involves Mixed Media. I don't use a heat tool to dry my mixed media projects, as it ruins the project. Using a heat tool to dry your projects, tends to create a lot of air bubbles on the projects, which doesn't look nice. I find air dried projects to be more studier. It also give the project a neater look.

I craft every night, I would make one finished Card, one unfinished Album (which I do finish later on, after the drying when I am using Mod Podge or after cutting all the fussy cuts) and one unfinished Mixed Media Project (which I do finish later on, after the drying or so). Then the next night I will continue doing my Album to try and finish it (depends also if I am still using Mod Podge), then my Mixed Media (depends if I still need to use other Wet Medium) and another Card or I will go and jump on my fourth project. Believe me, I have a lot of projects in mind all the time. What I always do is Sketch or Write down my projects using my Phone, so that I won't forget it. I am not good in drawing I just Doodle it. LOL. If crafting is an Office Job, I will be very happy to go to my workplace everyday. I usually craft at night, due to the fact that I am a stay-at-home mom and I have an almost 2 year old son who loves to craft with me. Believe it or not, he does the Mod Podging for my projects, of course with my guidance, and some paintings too. But since I'm a confessed Craft-a-holic, I try to finish every house chores in the morning before my son comes back from the Nursery so I can craft! I take advantage of watching TV with my husband and with my son by fussy cutting while watching and I also take advantage of texturing or gluing onmy projects while cooking. "Imagine your life with me, if I'm your wife! LOL". But nonetheless. I don't forget my Duties as a Wife and a Mom. I see to it that everything is in order everyday before I craft, food is ready, house is clean and my son is well fed. Playtime with my son is crafting with him, so I don't have a problem at all, because he enjoys it, or I take him out, which he loves to do as well.

I hope you all will enjoy my posts. Please do leave a comment, follow me or add me to your circle.

Happy Crafting!

Sunday, February 28, 2016

Card of the Day - February 28, 2016

Good day Crafters!

Today I wanted to do some colouring, so I've decided to use my Stamping' Up Perfect Peacock Stamp to do a Card.  I also did use Spellbinders Labels Eighteen for the layering of this Card and Stamping Up Inkpads, Pear Pizzas and Tempting Torquise.

I stamped my image using Memento Tuxedo Black and Color it using my Copic Markers.

So here goes my Card of the Day!


Hope you all enjoyed it!  Happy Crafting!!!!


Thursday, February 25, 2016

Card of the Day - February 25, 2016

Good day Crafters!

I am still experimenting on my Sue Wilson Dies and I just can't get enough of it!  I am about to order more!

My card share for today is an Easy-Peasy 10min Card.  Yes! you can do it in 10min.  So here it goes!!!


Hope you all liked it!!

Happy Crafting!!!! =)

Wednesday, February 24, 2016

Card of the Day - February 24, 2016

Good Day Crafters!

Here goes my Card of the Day!

Its an Easel Card made from Sue Wilson Dies.  I soooooooooooooooooo love Sue Wilson Dies!  I've been playing around with it, with different Card Folds, and this is what I've made.

I hope you all enjoyed it, Happy Crafting!!!!!

Tuesday, February 23, 2016

Card of the Day - February 23, 2016

Good Day Crafters!
My Card of the Day is something that involves cutting to the nth power. LOL.  I don't know how to call this card, so I just call it "Stand Up Card" since the card stands up on its own. LOL.  It somehow resembles to a Calendar that Stands, but I do not want to call it a "Calendar Card" as people will be expecting that it will have a Calendar on it.  So I called it "Stand-Up Card" LOL.
In this card, I will be showing everyone how to do the shadow background technique using Mica Powder and Embossing Powder.  So here's the Card!


LET'S DO IT!!!!!

Materials & Tools Required:
  1. Cardstock :  Red, White and Gold Foil Cardstock
  2. Embellishments:  Red Ribbon, Pearls, Thin Metal Butterfly, Crystals and Handmade Flowers.
  3. Mica Powder :  Rangers Sour Apple & Biscotti.
  4. Embossing Powder :  Zing's Metallic Green
  5. Embossing Ink, Memento Black Inkpad & Heatgun
  6. Stamp:  Stampin Up Vines, Fishers Wishes
  7. Embossing Folder:  Lattice
  8. Die :  SPELLBINDERS - Gilded Gate # 2 Die
  9. Glue :  Double Sided Tape, Hot Glue and Wet Glue


Steps
1.  You'll be needing a 270gsm - 300gsm 12 x 12 Cardstock to create your card base.  Please refer to the illustration below:


2.  Prepare the top layer of the card using a different color cardstock.  Kindly refer to the legend of the illustration below:


  • Fan fold the score lines.  Please refer to the images below:


  • Attach the top layer to the card base, starting from the bottom to the top, refer to the images below. 


3.  Prepare the second layer of the card, using the same color as of your card base.  Please refer to the illustration below for the measurements of the U-Shaped Cutout.

  • Emboss the U-shape cutout with your desired embossing folder and layer it on top of your card.  Please refer to the image below:

4.  Now Cut the following:
A = Red Cardstock
B = White Cardstock
C = Gold Foiled Cardstock
  • A. 3.98 inches x 3.48 inches  B. 3.96 inches x 3.46 inches.
  • A. 7.98 inches x 6.98 inches  B. 7.96 inches x 6.96 inches.
  • C.  die cut using Spellbinders - Gilded Gate 2
5.  Now the background stamping shadow technique using embossing powder and Mica Powder...

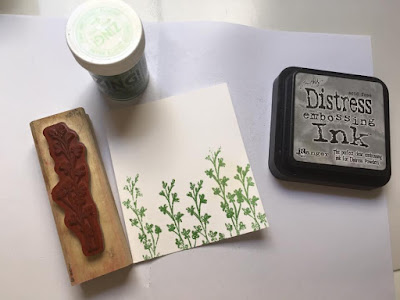
Using Cardstock a. 3.96 inches x 3.46 inches.  I first stamped and embossed my image using an embossing powder and heat it up to melt the powder.  NOTE:  You can use any color of embossing powder as you desired, you can also use any leafy stamp as per your desire.


hen I stamped it over again and used a lighter shade of green Mica Powder aka Perfect Pearls on the stamp image.  NOTE:  you should use a light color / shade of Mica Powder depending on the color of your embossing powder.

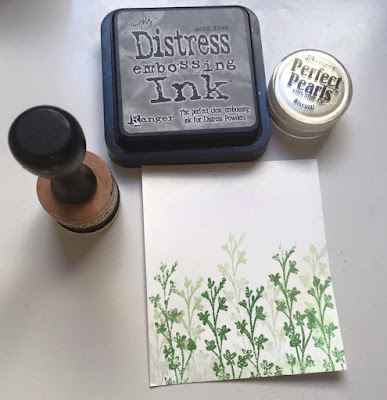
I then distressed it with a Biscotti Mica Powder on the Sides.

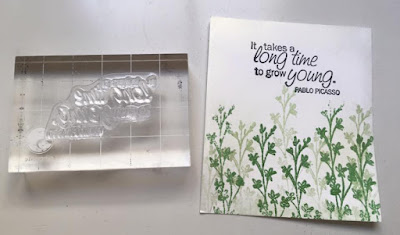
Stamped my Sentiment.
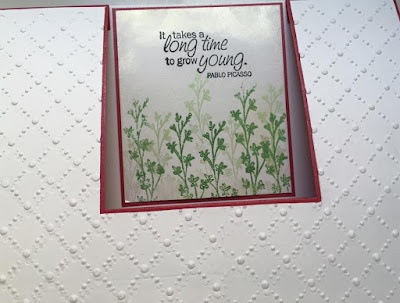
layered it on my "a" (red cardstock) and place it in the center of my card, where there is an opening.

I basically did the same technique with the other remaining cutouts except that I added some gold mica and some crystals to embellish it.  THIS WILL BE THE INSIDE OF YOUR CARD.

6.  Handmade Flowers:  I basically made my flowers, using my Curio.  I used Vellum and Red Cardstock.  I also formed and it and added a pearl on the center of it.  I was not able to use all of them thou.


7.  ASSEMBLAGE:

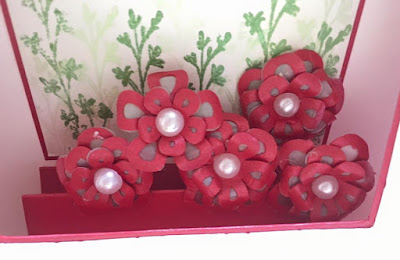
You can use any other flowers as desired and place it on the folded part of front card, where the sentiment was placed, like so.
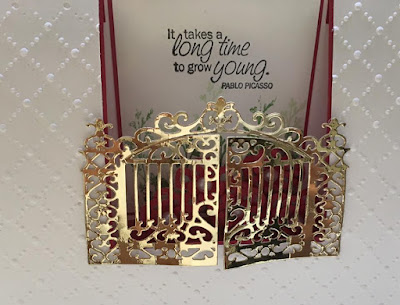
I have place my Gate Die Cut, like so.
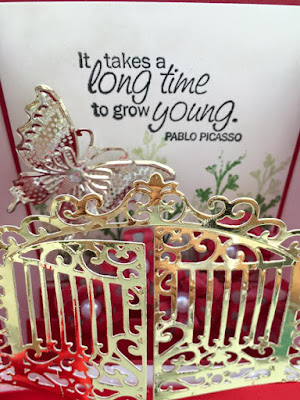
I've added a thin metal embellishment like so.  You can use any butterfly as you like.

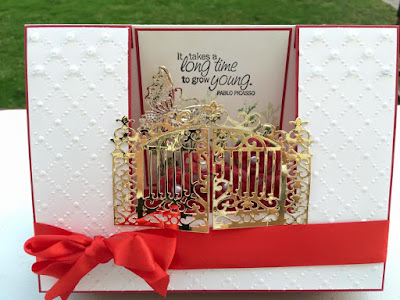
I also added some ribbon and some pearls on the upper top portion like so.

Place the inside layer inside the Card.


And here it is!!!!!!
It can stand up and it can fold flat just like any other Cards.


Thats it!  Hope you all Enjoy the Card!!!
Happy Crafting!!! =)


Monday, February 22, 2016

Card of the Day - February 22, 2016

Good day Crafters!

Here's my card of the day! =)


I have gilded the inside of the die cut with a glitter.

Layered some tule, die cuts and bow.

Materials used:

1.  Creative Expressions - Sue Wilson Dies
     a.  Rose Garden Striplet
     b.  Meridian Ledger
     c.  Canadian Collection Vancouver
2.  Crystal Glitter
3.  Mica Powder
4.  Ribbon:  Silver and Metallic Silver
5.  Glue, Hot Glue, Double Sided Tape & Double Sided Foam Tape
6.  Pearls
7.  Fikars Stamp - Wishes
8.  Tule
9.  Embossing Silicon
10.  Embossing Ink
11.  Cardstocks  :  White and Foiled (silver)
12.  Memento Inkpad Black

Sunday, February 21, 2016

Im sorry I missed your birthday card

Hello Crafters,

So I was in-love with the gilded technique using the rose striplet, so I decided to duplicate the same card using the same technique.  I hope you guys don't get bored of it.  I simply just like it so much.  Lol.

So here it goes.

Front

Inside the Card.  I left it blank so that I can write a something on it.

Hope you all enjoyed it.  Happy Crafting!!!!!


Friday, February 19, 2016

February Mood Board Challenge!

Hello Crafters!

Today I want to share a project I have made for a Challenge:  February Mood Board.  As per the challenge, we have to use pearls, flowers, a picture, lace and a frame for the project.  We also need to follow the Mood Board Colors and use a box that we can buy from a place called Daiso.

I have decide to do mixed media with my box and cut out the cover to make it look like a frame.  So here it goes.....


The Mood Board Colors

My February Mood Board Challenge Entry.

I hope you all enjoyed it.

Happy Crafting!!!!

Tuesday, February 9, 2016

Cards Using Sue Wilson Dies


Good Day Crafters!!

Ive been dying to use my Sue Wilson Dies for Months now.  Fortunately, I finally get the time to do so.  Today, I want to share a Wedding Card & a Gatefold Card using Sue Wilson Dies. 


Hope you all like it.

Happy Crafting.

Wedding Exploding Box

Hello Crafters!!

Its been a long time....
As promised here is the Wedding Explosion Box that I've made for a Client.  I wasn't able to take good pictures of it as I was in a rush to send it to the Client.  I have embossed the outside corners of the box as well as the inside.


Hope you all like it.
Happy Crafting!!

09 10