Welcome to my Crafting World!

Hi! My name is Maria, I am 34 years old and I'm a certified Craft-a-holic! LOL. I make different kinds of projects from Cards (which is my favourite), Art Tags, Mini Albums, Jewelries, Candles, Party Favours etc...

I've created this blog to share my projects and ideas to everyone who loves to craft.

Being a Certified Craft-A-Holic, you would expect to see me creating 3-4 projects simultaneously in one night. But of course, I don't finish them all in one night, esp. when I am doing a project that involves Mixed Media. I don't use a heat tool to dry my mixed media projects, as it ruins the project. Using a heat tool to dry your projects, tends to create a lot of air bubbles on the projects, which doesn't look nice. I find air dried projects to be more studier. It also give the project a neater look.

I craft every night, I would make one finished Card, one unfinished Album (which I do finish later on, after the drying when I am using Mod Podge or after cutting all the fussy cuts) and one unfinished Mixed Media Project (which I do finish later on, after the drying or so). Then the next night I will continue doing my Album to try and finish it (depends also if I am still using Mod Podge), then my Mixed Media (depends if I still need to use other Wet Medium) and another Card or I will go and jump on my fourth project. Believe me, I have a lot of projects in mind all the time. What I always do is Sketch or Write down my projects using my Phone, so that I won't forget it. I am not good in drawing I just Doodle it. LOL. If crafting is an Office Job, I will be very happy to go to my workplace everyday. I usually craft at night, due to the fact that I am a stay-at-home mom and I have an almost 2 year old son who loves to craft with me. Believe it or not, he does the Mod Podging for my projects, of course with my guidance, and some paintings too. But since I'm a confessed Craft-a-holic, I try to finish every house chores in the morning before my son comes back from the Nursery so I can craft! I take advantage of watching TV with my husband and with my son by fussy cutting while watching and I also take advantage of texturing or gluing onmy projects while cooking. "Imagine your life with me, if I'm your wife! LOL". But nonetheless. I don't forget my Duties as a Wife and a Mom. I see to it that everything is in order everyday before I craft, food is ready, house is clean and my son is well fed. Playtime with my son is crafting with him, so I don't have a problem at all, because he enjoys it, or I take him out, which he loves to do as well.

I hope you all will enjoy my posts. Please do leave a comment, follow me or add me to your circle.

Happy Crafting!

Sunday, May 24, 2015

Dogwood Flower & Mini Waterlilies

Good day Crafters!

I want to share some experiments I have done.  I used the Sizzix - Susan Garden's Die - Dogwood for this project.

The dogwood flower, I have copied it from a video by Susan on assembling the flower die, while the mini waterlilies, I have improvised it myself using the same die.  I was dreaming of putting a frog on it and a waterfall effect, but unluckily I dont have any stamps, or anything with a frog and my waterfall wont fit in it.  I am planning to make a bigger one =).  But here is how my experiment goes.
Dogwood Flower & Mini Waterlilies

Dogwood Flower

Mini Waterlilies
Hope you all enjoy it.  Here's a link on my video tutorial:  https://www.youtube.com/watch?v=j47iSyKNsqY&feature=youtu.be

Wednesday, May 13, 2015

Card 0005 - Wishes

Good Day Crafters!

Its been a long time since I've made a card, so when I saw a very beautiful white cardstock in my stash (the texture and the pearl shimmer of the cardstock doesnt show in the picture thou) it made me decide to make a card.  I was experimenting on my dies to create a new card.  So here goes a very simple card.


Step by Step Tutorial:

I have die cutted Anna Griffin - Flourish Emblem, Spellbinders - Nesting Ovals & Spellbinders- Opulent Ovals.
I also die cutted two Spellbinders - Damask and stamped out a sentiment with Fiskars - Wishes stamp set using my Stazon - Jet Black inkpad on the oval die cut.
I have cutted out a rectangular frame (the same size as my flourish emblem) using my paper cutter, leaving 1inch on each sides.  Then I scored it just a little above the middle rectangle for an added neat look.
I attached a white ribbon and a white lace on the flourish emblem die cut and attached it underneath my frame using a double sided tape.
I have attached the Opulent Oval die cut on top of my flourish emblem using a foam tape and them I've attached the whole frame on top of my card base using a foam tape as well.
I attached the two Damask die cuts at the back of my oval die cut using a double sided tape.

I layered my Oval die cut with the damasks die cut on top of my Opulent Oval die cut with a double sided foam tape.
I've added some pearls on the sides of the frame to hide the unwanted cuts and added some more on the flower lace to accentuate it.  And wallah!  A very simple card!


Hope you all enjoy it!  Happy Crafting! =)


Tuesday, May 12, 2015

ATC 0003 - Earth & ATC 0004 - Wind

Good Morning Crafters!

I have finished my last two ATCs, the Earth and the Wind.  I would like to share them to all of you.

ATC - Earth.  I was thinking about earthly colors, of course that includes brown and green.  My inspiration is the earthly forest that has been featured in one of the SOAP that I have watched long back (I cant even remember the title of the soap).  So here it goes...


ATC 0004 -Wind.  OMG!  This was an extra challenge for me, first and foremost ive never done anything that involves wind, secondly wind cannot be illustrated unlike the other elements and last but not the least I AM NOT A PAINTER.  Lol.  So the first thing that came into my mind was a flying feather, then some windmills, then some dandelions, but then when I finished the whole background, the flying feather does not fit the frame of the ATC, so I've decided to just continue with the dandelions and the windmills.  You'll notice that I've made a slight mistake on stamping the legs of my windmills.  I tried to cover them up by sprinkling some glitters all over.  I made the ATC plain and simple, as I want it to be as simple and plain as the wind.  So I hope you all enjoy this one as well.


I hope you all enjoy my Earth, Wind, Fire and Water ATCs.  Happy Crafting! =)

Monday, May 11, 2015

Artist Trading Card - 0001 & 0002

Good day crafters!

Today I've decided to create atc cards that will display my kind of art and my kind of designs.  I love the sea, everything about nature, vintage and shabby chic.  So you will be seeing those kind of designs in my ATCs.  So here it goes my ATC 0001 - Water and ATC 0003 - Fire.

ATC 0001 - Water.  So I was thinking I want to make 4 ATCs.  I have an idea in mind of making Earth, Wind, Fire & Water (the four elements).  I started creating the water first, since I love the beach.  I love shells, so I put in a lot.  I was thinking of a fishnet, since I do not have any small fishnet available,  I used a burlap.  I used my spellbinders stencil for the bubbled layer and I was thinking about the sea being sun-kissed, that's why I used the color yellow on the top.  I added a flower to accentuate it.  I dropped on some glossy accents for a more bubbly and watery effect.


ATC 0002 - Fire.  As Ive said earlier I was thinking about the four elements.  I havent done any mixed media or crafts that was a mixed of fire colors.  So here, I was thinking about lots of ashes mixed with fire and some burnt metal.  I used tim holtz word band - SALVAGE, thinking this are the stuffs that can be salvaged whenever there's fire.  LOL.  Ive used the metal gears to symbolize the things that can be salvaged, thinking that most things that are made of metals can be salvaged from fire.  LOL.  Im thinking in an "insane way" i guess, but that's how I make my designs.


I hope you all liked it.  Happy Crafting!

Wednesday, May 6, 2015

Mixed Media Tag 0001 - Swallowtail

Good Evening Crafters!

This is my first ever Mixed Media Tutorial that has a voice over. LOL.


Please do pardon me if im runnig out of words, as I was very tired while doing the voice over for this video.  I have done the video in the afternoon and then did the voice over late pass bedtime, after during a million house chores and doing a lot of things for my business.

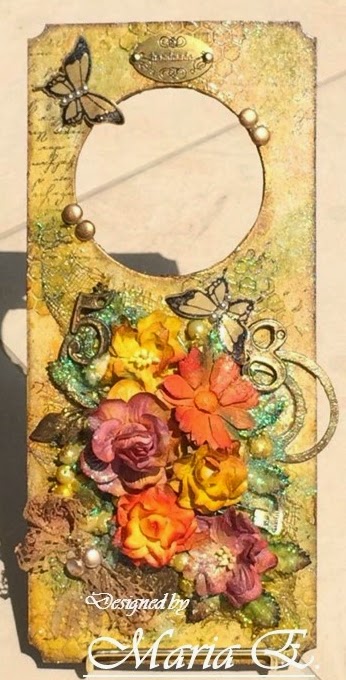
I am teaching mixed media tag usind multiple techniques and I am also teaching how to use the embellishment and how to choose the colors.

In this tutorial, I did not state the placement of the embellishments, neither did I tell how I choose my colors.  As this things are being taught in class.  I also did not do multiple techniques in the mixed media tag.  I used only 3.  In my class I teach multiple techniques in one tag, I also teach my student how to use the different tool and coloring vectors that are used in mixed media (properly).

When I was making this tag, I was just thinking of using the swallowtail butterfly stamp from Stampin' Up, I randomly decorate it (I already have the knowledge of using multiple mixed media techniques, thats why its not a big issue for me) and randomly choose my colors (I already have the knowledge in mixing colors, thats why its easy for me to randomly choose).

I have uploaded the video on youtube, here's the link.


https://www.youtube.com/watch?v=QETYpnxgaUs


Hope you all enjoy!
See you all in my next Class!  Happy Crafting! =)

Mixed Media Door Hanger 0001

Good Afternoon Crafters!

Today I would like to share a door hanger that I have made.  I used a lot of shimmer in it, to make sure that my project will glow.  Here it goes!


Materials/Tools used:

  • Sizzix Bigz Die - Classique by Prima
  • Sizzix Movers and Shapers - Circle
  • We R Memory Keepers - Corner Chomper
  • Martha Stewart - Rose Leaf Punch
  • Stampin Up - Butterfly Punch
  • Stampin Up - Nature's Perfection Stamp Set
  • Hero Arts - Old Letter Writing Stamp
  • Tim Holtz Distress Stain - Tarnish Brass
  • Tim Holtz Distress Stain - Spiced Marmalade
  • Tim Holtz Distress Stain - Wild Honey
  • Tim Holtz Distress Stain - Peled Paint
  • Tim Holtz Distress Inkpad - Wallnut Stain
  • Tim Holtz Embossing Ink
  • Zing Embossing Powder - Metallic Green
  • Zing Embossing Powder - Metallic Gold
  • Martha Stewart - Gesso
  • StazOn - Jet Black Inkpad
  • Rangers Perfect Pearls - Copper
  • Crafters Workshop Stencil - Punchinella
  • Antique Gold Acrylic Pant
  • Homemade texture paste
  • Mod Podge - Matte Glue
  • Mod Podge - Gloss Acrylic Sealer
  • Chipboards
  • Bluish White Glitter from my Stash
  • Some Pearls from my stash
  • Some Lace from my Stash
  • Some metal findings from my stash
  • Some micro beads from my stash
  • Some Cheese Cloth from my stash
  • Some flowers from my stash
  • Some brads from my stash


I hope you all enjoy it.  If you have questions please feel free to comment or email me at jcslittlehands@gmail.com / info@jcslittlehands.com.

Happy Crafting!


Tuesday, May 5, 2015

Mixed Media Clock 0001

Good Evening Crafters!

Tonight I want to share a clock frame project that I have made.  I am also on the process of doing a big version of my clock frame project using a canvas.  So here it goes.


Materials/Tools Used:
  • Chipboards
  • A Frame from a Dollar Store
  • Sizzix Bigz Die - Branch Tree
  • Sizzix Bigz Die - Garden Leaves
  • Sizzix Bigz Die - Flourish
  • Tim Holtz Stencil - Bubbles
  • Metallic Gold Acrylic Paint
  • Tim Holtz Distress Ink - Walnut Stain
  • Metal Findings Numbers
  • Clock Motor
  • Spanish Moss - Brown
  • Garden Moss - Green
  • Dimensional Paint - Brown
  • Dimensional Paint - Black
  • Air Dry Clay
  • Black Markers
  • Distress Stain - Tumbled Glass
  • Distress Stain - Wild Honey
  • Metal Findings - Handmade
  • Tim Holtz Paper Pad - Wallflower
  • Pearl Green Acrylic Paint
  • Gesso
  • Homemade Texture Paste
  • Paper Flowers from my Stash
  • Mod Podge - Matte Glue
  • Burlap
  • Cheese Cloth
Happy Crafting!=)


09 10