Welcome to my Crafting World!

Hi! My name is Maria, I am 34 years old and I'm a certified Craft-a-holic! LOL. I make different kinds of projects from Cards (which is my favourite), Art Tags, Mini Albums, Jewelries, Candles, Party Favours etc...

I've created this blog to share my projects and ideas to everyone who loves to craft.

Being a Certified Craft-A-Holic, you would expect to see me creating 3-4 projects simultaneously in one night. But of course, I don't finish them all in one night, esp. when I am doing a project that involves Mixed Media. I don't use a heat tool to dry my mixed media projects, as it ruins the project. Using a heat tool to dry your projects, tends to create a lot of air bubbles on the projects, which doesn't look nice. I find air dried projects to be more studier. It also give the project a neater look.

I craft every night, I would make one finished Card, one unfinished Album (which I do finish later on, after the drying when I am using Mod Podge or after cutting all the fussy cuts) and one unfinished Mixed Media Project (which I do finish later on, after the drying or so). Then the next night I will continue doing my Album to try and finish it (depends also if I am still using Mod Podge), then my Mixed Media (depends if I still need to use other Wet Medium) and another Card or I will go and jump on my fourth project. Believe me, I have a lot of projects in mind all the time. What I always do is Sketch or Write down my projects using my Phone, so that I won't forget it. I am not good in drawing I just Doodle it. LOL. If crafting is an Office Job, I will be very happy to go to my workplace everyday. I usually craft at night, due to the fact that I am a stay-at-home mom and I have an almost 2 year old son who loves to craft with me. Believe it or not, he does the Mod Podging for my projects, of course with my guidance, and some paintings too. But since I'm a confessed Craft-a-holic, I try to finish every house chores in the morning before my son comes back from the Nursery so I can craft! I take advantage of watching TV with my husband and with my son by fussy cutting while watching and I also take advantage of texturing or gluing onmy projects while cooking. "Imagine your life with me, if I'm your wife! LOL". But nonetheless. I don't forget my Duties as a Wife and a Mom. I see to it that everything is in order everyday before I craft, food is ready, house is clean and my son is well fed. Playtime with my son is crafting with him, so I don't have a problem at all, because he enjoys it, or I take him out, which he loves to do as well.

I hope you all will enjoy my posts. Please do leave a comment, follow me or add me to your circle.

Happy Crafting!

Wednesday, June 17, 2015

Tim Holtz Tags of 2015 - June

Good Afternoon Crafters!

I have been thinking of joining Tim Holtz Tags of 2015 Challenge, but unfortunately I didnt get enough time to do so.  Since I am very much free today, I have decided to finally do it.  =)

For the month of June its all about creating a simple plaid background.  His challenge has taught me simple and multiple techniques.  I have incorporated the techniques in my tag.  My tag turns out simple but gorgeous, thanks to Tim Holtz!=).  

Here's Tim Holtz June 2015 Tag:


And now this is my version,......


So here goes my tutorial!  Creating the background wasnt that easy.  I've used a couple of tags before I get that spotted background thingy.  LOL.  I used Ranger Tim Holtz - Vintage Photo Spray Stain.  And then, I layed over my Tim Holtz Stampers Anonymous Stencil - Stripes and ink it up with Ranger Tim Holtz Distress Inkpad - Mowed Lawn and Ranger Tim Holtz Distress Inkpad - Peeled Paint.  I also did used my blending tool to push the colors that are hanging over my stencil into my tag.  


Then I distressed it with Tim Holtz Tonic Studio - Paper Distresser and Ranger Tim Holtz Distress Inkpad - Walnut Stain.


I've cut a strip of burlap and lay out over my tag.  Like this:


Then I started preparing my embellishments.  I die cut a Sizzix Tim Holtz Movers & Shapers - Sewing Room.  Painted the dressform with Ranger Tim Holtz Distress Paint - Tarnished Brass and the spool with Ranger Tim Holtz Distress Paint - Walnut Stain .  Afterwards I distressed both of them with Ranger Tim Holtz Distress Inkpad - Walnut Stain and decorate both of them.  Then I also die cut some Sizzix Tim Holtz - Tattered Florals used the small flowers (3 cutouts), distressed them with Ranger Tim Holtz Distress Inkpad - Barn Door, Ranger Tim Holtz Distress Inkpad - Mowed Lawn and Ranger Tim Holtz Distress Inkpad - Walnut Stain. Layered them over each other and added a brad from my personal stash to attach them.  Unfortunately my burlap wasnt of good quality, so every strands was torned down, and I have to do a lot of polishing.  LOL.  I also cut out some corrugated box and distressed it with Tim Holtz Tonic Studio - Paper Distresser and Ranger Tim Holtz Distress Inkpad - Walnut Stain.

Sizzix Tim Holtz Movers & Shapers - Sewing Room Die Cut from a medium weight chipboard.


Dressform painted with Ranger Tim Holtz Paint - Tarnished Brass
Dressform Distressed with Ranger Tim Holtz - Walnut Stain and added some left-over lace from my personal stash as the skirt.  Then I added a Tim Holtz Idea-logy - Linen Ribbon as a belt.

Spool painted with
Ranger Tim Holtz Paint - Walnut Stain Distress Paint.


Spool distressed with Ranger Tim Holtz - Walnut Stain Inkpad and decorated with Tim Holtz Idea-logy - Solid Paper String,
Sizzix Tim Holtz - Tattered Florals.  Used 3 small flowers distressed and embellished.
Distressed with Ranger Tim Holtz Inkpad - Walnut Stain & Tim Holtz Tonic Studio - Paper Distresser.  Cutout corrugated paper (from a corrugated box).
I also distressed a Tim Holtz Idea-logy Linen Ribbon using Ranger Tim Holtz Inkpad - Walnut Stain inkpad, and tried to loosen the fibers in it.

Tim Holtz Idea-logy - Linen Ribbon
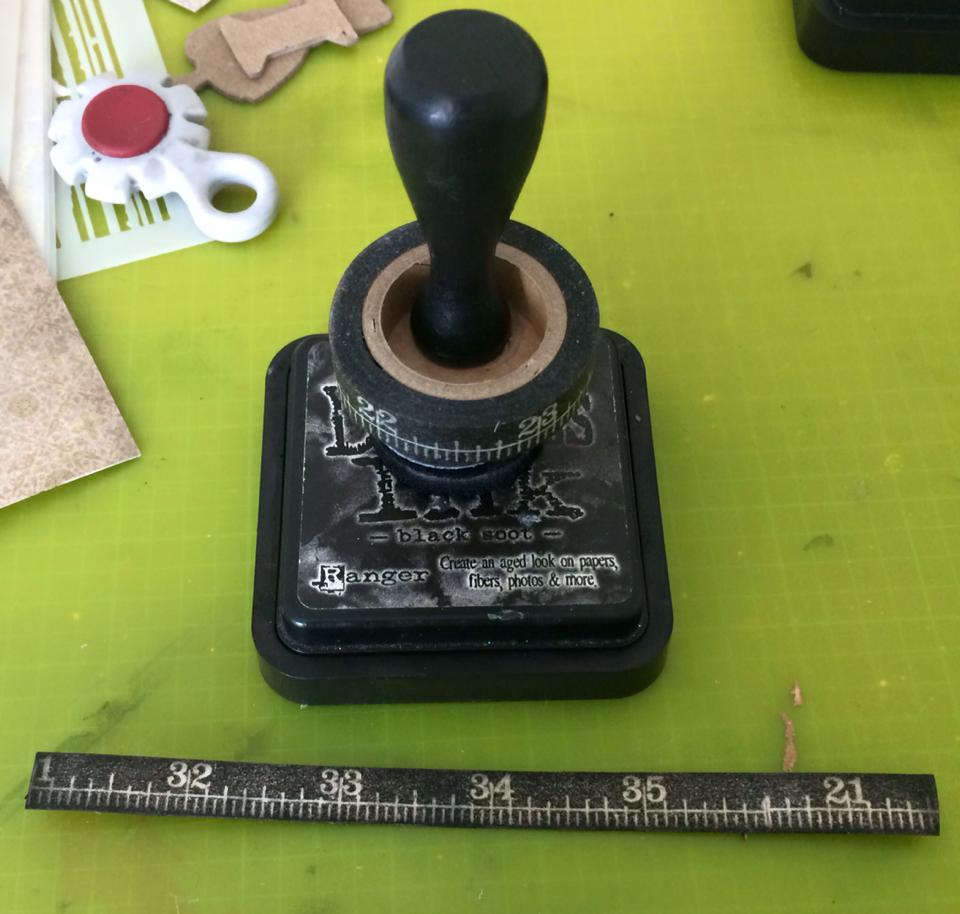
I also made a tape measure using a Tim Holtz Ide-logy - Tissue Tape Elements.  I lay the tape down my left over cardstock, cut it out and distressed it with Ranger Tim Holtz Inkpad - Black Soot.  I also stamp a sentiment with my Versafine Inkpad - Black Onyx and from Tim Holtz Stamper's anonymous - Phrases 2 on a cardstock, cut it out and distressed it with a Tim Holtz Tonic Studio - Paper Distressor and Ranger Tim Holtz Inkpad - Walnut Stain.


I prepared my Tim Holtz Idea-logy - Trinket Pins, Tim Holtz Idea-logy -Philosophy Tags, Tim Holtz Idea-logy - Hanger Clips and Sewing Machine Embellishments from my personal stash.  I assembled them all on my my tag.  I also used my We R Memory Keepers Big Bite to attach a We R Memory Keepers bronze eyelet on my tag.


add the Tim Holtz Idea-logy - Trinket Pins and Tim Holtz Idea-logy - Philosophy Tags.  Then I attached it on a double bow ive made with the Tim Holtz Idea-logy - Linen Ribbon.
Attached all the elements.

MATERIALS USED:
  • Manila Tag
  • Burlap
  • Ranger Tim Holtz Distress Inkpad - Walnut Stain
  • Ranger Tim Holtz Distress Inkpad - Black Soot
  • Ranger Tim Holtz Distress Inkpad - Barn Door
  • Ranger Tim Holtz Distress Inkpad - Mowed Lawn
  • Ranger Tim Holtz Distress Inkpad - Peeled Paint
  • Versafine Inkpad - Black Onyx
  • Ranger Tim Holtz Distress Paint - Tarnished Brass
  • Ranger Tim Holtz Distress Paint - Walnut Stain
  • Tim Holtz Stampers Anonymous Stencil - Stripes
  • Tim Holtz Stampers Anonymous Stamp - Phrases 2
  • Tim Holtz Idea-logy - Trinket Pin
  • Tim Holtz Idea-logy - Hanger Clips
  • Tim Holtz Idea-logy - Solid Paper String
  • Tim Holtz Idea-logy - Linen Ribbon
  • Tim Holtz Idea-logy - Philosophy Tags
  • Tim Holtz Idea-logy - Tissue Tape Elements
  • Sizzix Tim Holtz Movers & Shapers - Sewing Room
  • Sizzix Tim Holtz - Tattered Florals
  • Tim Holtz Tonic Studio - Paper Distresser
  • Ranger Tim Holtz - Blending Tool
  • We R Memory Keepers - Big Bite
  • We R Memory Keepers - Eyelet
  • Water Spritzer
  • Sewing Machine Embellishment from my personal stash
  • leftover cardstock
  • Mod Podge
  • Hot Glue
Hope you all enjoy it.  I would love to hear your comments!  Thank you! =)

Monday, June 15, 2015

Altered CD 0002 - Crafter's Dream Catcher

Good Evening Folks!

As promised, I'm about to share the second altered cd that I've made for the "Altered CD Swap".  If you can notice, I've been placing "Designed and Created by" on the bottom part of my creations nowadays, unlike before that I'm just placing "Designed by Maria E.".  Its because I've been doing a workshop for a couple of students on how to create something out of Tim Holtz Configuration Boxes and Graphic 45 Papers.  For this workshop, I designed a configuration box with graphic 45 papers for them to copy.  Don't get me wrong, I let them copy the design that I have made for them to learn how to make different kinds of embellishments and how to create something out of nothing.  I prepare different designs for each student to create with my help of course.  It's a one on one workshop and it takes 3-4 days to finish (with all the drying, cutting, gluing, painting etc.. etc..).  In a few days I will be posting the projeccts they have made for the workshop.  Soon you'll be noticing different creators but the same designer (which is me, I guess?! lol) on my blog.  Anyway, enough of the blah blah blah this is way too long...........

Yesterday I've posted my first altered cd for the upcoming "Altered CD Swap", wherein we have to make 3 altered cds.  So tonight, I want to share my second altered cd.  Before I created this altered cd, I was thinking I want to make something like a house decor.  First thing that comes into my mind is a clock, then a tissue holder, then a locket, then a door hanger but I ended up creating a dream catcher. LOL.  I wont talk much anymore, lets just go straight into it....... =)

Front


Back


MATERIALS / TOOLS USED:

  • We R Memory Keepers - Crop A Dile Big Bite
  • We R Memory Keepers - Eyelets
  • Zing Embossing Powder - Copper
  • Ranger Tim Holtz Distress Inkpad - Wallnut Stain
  • Stampin' Up Paper Punch - Tag
  • Tim Holtz Paper Pad - Wall Flower
  • Tim Holtz - Distressor
  • Tim Holtz Idealogy - Ornate Plates
  • Mod Podge
  • Hampton Arts Stamp
  • Assorted Flowers from Wild Orchid
  • Heat Gun
  • Leaves fro WIld Orchid
  • Pollen from my Personal Stash
  • Tussels from my Personal Stash
  • A Gold Chain from my Personal Stash
Hope you all enjoy it!  Would like to hear from you soon... Just leave a comment. =)
Happy Crafting!!!! =)

Sunday, June 14, 2015

Altered CD 0001 - Fussy Baby Cutting

Good Evening Crafters!

Its been a long time since I posted something on my blog.  I have been busy doing workshops for my students and teaching crafting classes.  Aside from that I was also busy with house chores, taking care of my little one and selling crafting products on my online website.  I was juggling around my schedule everyday that I cant find time to sit and craft.

Tonight I would like to share one of the altered cds that I have made for a swap.  We actually need to make three (3) and I made two today (I am just drying the other one, I will share the other altered cd tomorrow).  As I was saying I have a hectic schedule everyday, making two (2) altered cds today was quite an accomplishment for me, because I was too busy running my online store while registering my baby for swimming lessons (they call it aqua baby) and taking care of him of course.  Then I have to do some grocery shopping, some house chores, prepare my Husband's dinner and then put my little one to sleep.

Im completely BLANKED on ideas for an altered cds this morning.  So I just started cutting some of my Graphic 45 Mother Goose papers.  While cutting it out, I was thinking maybe I'll do something that can be hanged and something funny about fussy cutting and babies.  LOL.  So here it goes!


Back

Materials Used:

  • Left Over from 8x8 Graphic 45 Mother Goose Paper Pad
  • Some Lace, Buttons, Pearls and Tiny Pacifier from my Stash
  • Old CD
  • Mod Podge
  • Ranger - Tim Holtz Distress Inkpad Salty Ocean
  • Ranger - Tim Holtz Distress Inkpad Walnut Stain
  • Left over cream cardstock for printing
Hope you all enjoy it!  I will be posting again soon! =)

Sunday, May 24, 2015

Dogwood Flower & Mini Waterlilies

Good day Crafters!

I want to share some experiments I have done.  I used the Sizzix - Susan Garden's Die - Dogwood for this project.

The dogwood flower, I have copied it from a video by Susan on assembling the flower die, while the mini waterlilies, I have improvised it myself using the same die.  I was dreaming of putting a frog on it and a waterfall effect, but unluckily I dont have any stamps, or anything with a frog and my waterfall wont fit in it.  I am planning to make a bigger one =).  But here is how my experiment goes.
Dogwood Flower & Mini Waterlilies

Dogwood Flower

Mini Waterlilies
Hope you all enjoy it.  Here's a link on my video tutorial:  https://www.youtube.com/watch?v=j47iSyKNsqY&feature=youtu.be

Wednesday, May 13, 2015

Card 0005 - Wishes

Good Day Crafters!

Its been a long time since I've made a card, so when I saw a very beautiful white cardstock in my stash (the texture and the pearl shimmer of the cardstock doesnt show in the picture thou) it made me decide to make a card.  I was experimenting on my dies to create a new card.  So here goes a very simple card.


Step by Step Tutorial:

I have die cutted Anna Griffin - Flourish Emblem, Spellbinders - Nesting Ovals & Spellbinders- Opulent Ovals.
I also die cutted two Spellbinders - Damask and stamped out a sentiment with Fiskars - Wishes stamp set using my Stazon - Jet Black inkpad on the oval die cut.
I have cutted out a rectangular frame (the same size as my flourish emblem) using my paper cutter, leaving 1inch on each sides.  Then I scored it just a little above the middle rectangle for an added neat look.
I attached a white ribbon and a white lace on the flourish emblem die cut and attached it underneath my frame using a double sided tape.
I have attached the Opulent Oval die cut on top of my flourish emblem using a foam tape and them I've attached the whole frame on top of my card base using a foam tape as well.
I attached the two Damask die cuts at the back of my oval die cut using a double sided tape.

I layered my Oval die cut with the damasks die cut on top of my Opulent Oval die cut with a double sided foam tape.
I've added some pearls on the sides of the frame to hide the unwanted cuts and added some more on the flower lace to accentuate it.  And wallah!  A very simple card!


Hope you all enjoy it!  Happy Crafting! =)


Tuesday, May 12, 2015

ATC 0003 - Earth & ATC 0004 - Wind

Good Morning Crafters!

I have finished my last two ATCs, the Earth and the Wind.  I would like to share them to all of you.

ATC - Earth.  I was thinking about earthly colors, of course that includes brown and green.  My inspiration is the earthly forest that has been featured in one of the SOAP that I have watched long back (I cant even remember the title of the soap).  So here it goes...


ATC 0004 -Wind.  OMG!  This was an extra challenge for me, first and foremost ive never done anything that involves wind, secondly wind cannot be illustrated unlike the other elements and last but not the least I AM NOT A PAINTER.  Lol.  So the first thing that came into my mind was a flying feather, then some windmills, then some dandelions, but then when I finished the whole background, the flying feather does not fit the frame of the ATC, so I've decided to just continue with the dandelions and the windmills.  You'll notice that I've made a slight mistake on stamping the legs of my windmills.  I tried to cover them up by sprinkling some glitters all over.  I made the ATC plain and simple, as I want it to be as simple and plain as the wind.  So I hope you all enjoy this one as well.


I hope you all enjoy my Earth, Wind, Fire and Water ATCs.  Happy Crafting! =)

Monday, May 11, 2015

Artist Trading Card - 0001 & 0002

Good day crafters!

Today I've decided to create atc cards that will display my kind of art and my kind of designs.  I love the sea, everything about nature, vintage and shabby chic.  So you will be seeing those kind of designs in my ATCs.  So here it goes my ATC 0001 - Water and ATC 0003 - Fire.

ATC 0001 - Water.  So I was thinking I want to make 4 ATCs.  I have an idea in mind of making Earth, Wind, Fire & Water (the four elements).  I started creating the water first, since I love the beach.  I love shells, so I put in a lot.  I was thinking of a fishnet, since I do not have any small fishnet available,  I used a burlap.  I used my spellbinders stencil for the bubbled layer and I was thinking about the sea being sun-kissed, that's why I used the color yellow on the top.  I added a flower to accentuate it.  I dropped on some glossy accents for a more bubbly and watery effect.


ATC 0002 - Fire.  As Ive said earlier I was thinking about the four elements.  I havent done any mixed media or crafts that was a mixed of fire colors.  So here, I was thinking about lots of ashes mixed with fire and some burnt metal.  I used tim holtz word band - SALVAGE, thinking this are the stuffs that can be salvaged whenever there's fire.  LOL.  Ive used the metal gears to symbolize the things that can be salvaged, thinking that most things that are made of metals can be salvaged from fire.  LOL.  Im thinking in an "insane way" i guess, but that's how I make my designs.


I hope you all liked it.  Happy Crafting!
09 10